Failure Diagnosis
This page provides self-help.
Simply click on the heading matching your particular issue to view potential solutions. Some issues may list a selection of potential causes. Each cause will include a link to subpages here in the SPEEDHUB Owners Manual where the process for each potential solution wil be described.
Troubleshooting
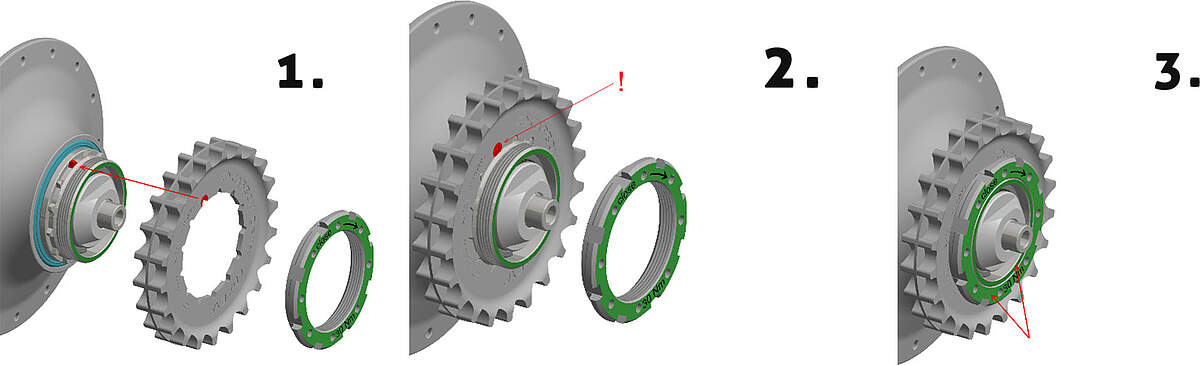
Mounting Instructions - Splined Carrier with Lock-Ring (Art.#8540L / Art.#8540SL)
- The Gates Carbon Drive splined sprocket must be placed over the Rohloff Carrier L/SL, as illustrated.
- Ensure the sprocket remains correctly positioned on the carrier, while threading the lock-ring onto the driver!
- The Lock-Ring must rest flush against the sprocket after threading onto the Rohloff Carrier L/SL! Finally, secure lock-ring to 30Nm (do not use screw locking agents) using a calibrated torque wrench.
Should operational noises appear when using either Gates Carbon Drive or Rohloff chain sprockets with this carrier, then re-check the components are mounted correctly, and reference the following FAQ.
FR: Instructions de montage du support cannelé (art. 8540L / 8540SL) avec Lockring (bague filetée 8538)
- La poulie Gates doit être insérée sur le support cannelé Rohloff L/SL comme illustré.
- Assurez-vous que la poulie est bien en butée sur ses cannelures avant de visser le Lockring.
- Nach korrekter Montage muss der Lock-Ring bündig mit dem Rohloff Carrier L abschließen! Danach mit 30Nm Anzugsmoment anziehen (kein Schraubensicherungsmittel verwenden).
Sollten Geräusche mit Riemenscheibe oder Rohloff Ritzel auftreten, kontrollieren Sie bitte die korrekte Montage und beachten folgenden FAQ Beitrag.
NL: Montage van de Splined Carrier L met Lock-ring voor Gates / rondsels (art.nr. 8540L)
- De Gates-poelie moet op de Rohloff Carrier L worden geplaatst zoals op de afbeelding.
- Zorg ervoor dat de Gates-riemschijf / rondsel in de juiste positie blijft wanneer u de Lock-ring vastschroeft!
- Na correcte montage moet de Lock-ring naadloos gelijk liggen met de Rohloff Carrier L! Draai vervolgens vast met een aandraaimoment van 30 Nm (gebruik geen schroefborgmiddel!).
Als er abnormale geluiden te horen zijn bij de riemschijf of het Rohloff-rondsel, controleer dan de juiste montage en let op het volgende FAQ-artikel.


Excessive play on the twist shifter (more than 2mm)
Solution: Readjust SPEEDHUB cable tension. See Maintenance and Care.
Gear indicator is not aligned correctly
Solution: Alter cable tension using the cable adjusters. See Adjusting the Gear Display.
Twist shifter will not rotate through all 14 gears
Cause 1: Shifter cables cut at the wrong length.
Solution: Trim cables to the correct length.
Internal gear mech: See Cable Routing, Internal gear mech.
External gear mech: See Cable Routing, External gear mech.
Cause 2: Incorrectly adjusted cable tension.
Solution: Adjust tension using the cable adjusters. See Maintenance and Care.
Cause 3 (for external gear mech): Gear mech "cog D" mounted incorrectly.
Solution: Remove and reinstall "cog D" in correct position.
See Wheel Installation, Joining of the external gear mech.
Twist shifter does not rotate freely
Cause 1: Cable tension too high.
Solution: Reduce the shifter cable tension. See Maintenance and Care.
Check the external gear mech: Select gear #14. Remove the cable box just enough so that the twist shifter can be turned without force and the cables keep their normal routing bends. Turn the twist shifter back and forth. If it does not turn smoothly, see causes 2–6. If it does turn smoothly, see cause 8.
Check the internal gear mech: Open the bayonet connectors and (holding a cable in each hand) pull the cables in turn. They run smoothly, see options 2–6. They do not run smoothly, see option 7.
Cause 2: Shifter cables worn, dirty or damaged.
Cause 3: Incorrect shifter cables (not original Rohloff).
Cause 4: Cable routing has too many bends or kinks.
Cause 5: Inner nylon cable liner has penetrated into the twist shifter or the cable box.
Solution for 2-5: Fit new shifter cables.
Internal gear mech: See Cable Routing, Internal gear mech.
External gear mech: See Cable Routing, External gear mech.
Cause 6: Twist shifter rubs against the grip itself.
Solution: Separate to leave a small gap between twist shifter rubber and the grip. Alternatively, fit a teflon washer between the two components.
Cause 6.1: Twist shifter degreased by weather.
Solution: Remove the twist shifter grip rubber, clean and regrease it. See Rubber Grip Replacement.
Cause 7: Hub cable broken / frayed (internal gear mech).
Solution: Check the shifter cables. Loosen the concertina tubes at the hub and pull them up towards the bayonet connectors, revealing the inner cable. Check the condition of these cables in gear positions 1 and 14. If the hub cable is damaged, it will need replacing. See Hub Cable Replacement.
Cause 8: Gear transfer box (external gear mech) is bent.
Solution: Replace the gear transfer box. See Procedure after removing the axle-ring.
Cause 8.1: Changing between gears 8 and 14 is not possible or only possible with extreme force.
Grub screw (after serial number 47,000 - external gear mech versions) is inserted too far into the axle. This must be protrude the axle end by approx. 2mm. See Grub screw of the External Gear Mech.
Cause 9: Hexagonal peg of the external gear mech does not turn freely (due to corrosion).
Solution: Check by placing an 8mm wrench over the hexagonal peg of the external transfer box. Shifting gears must have a light and positive feel when using the wrench to shift. If not, remove the external transfer box. Regrease the hexagonal peg and the "cog D". See Procedure after removing the axle-ring.
Cause 9.1: The cable pulley of the external gear mech doesn't turn freely (after the conversion from an internal to an external gear mech).
Solution: Check the correct orientation of the cog D over the hexagonal of the shifting shaft. See Procedure after removing the axle-ring, figure 8.
Twist shifter fails to rotate in 0° temperatures
Cause 1: Water has penetrated into the twist shifter and has frozen.
Solution: Remove the rubber grip. Clean, regrease this and replace the seal if necessary. See Rubber Grip Replacement.
Cause 2: Water has penetrated into the shifter cables and has frozen.
Solution: Replace shifter cables.
Internal gear mech: See Cable Routing, Internal gear mech.
External gear mech: See Cable Routing, External gear mech.
Cause 3: Water has penetrated into the cable box and has frozen.
Solution: Open the cable box, clean and replace the pulley with a little light grease. See Cable Routing.
Shifter cable has loosened from the cable clamp
(Cable pulley on external gear mech or bayonet connectors on internal gear mech)
Solution: Trim the frayed ends of the shifter cable and the cable housing by the same amount. Alternative: fit new cables. See Cable Routing.
Male bayonet connector has loosened from the hub cable
Solution: Replace hub cable. See Hub Cable Replacement.
Chain ratchets over the sprocket teeth
Cause 1: Chain defect (stiff chain link).
Solution: Loosen up the stiff link or replace the chain.
Cause 2: Worn sprocket or chain.
Solution: Flip or replace the sprocket. See Sprocket Replacement. Replace the chain.
Cause 3: Inadeuate chain tension.
Solution: Alter the chain length/adjust chain tension. See Chain Tensioner.
Chain springs off the sprocket - bicycles with a spring loaded chain tensioner
Cause 1: Chain tensioner is dry and turns with difficulty.
Solution: Grease the chain tensioner and/or replace the jockey wheels. See Maintenance and Care or Chain Tensioner Spring Replacement.
Cause 2: Chain tensioner spring is defective.
Solution: Replace the chain tensioner spring. See Chain Tensioner Spring Replacement. Check the min. chain length on full suspension bikes: See Chain Tensioner.
Cause 3: No chain guide in use.
Solution: Mount a chain guide: See Chain Guide. All bikes fitted with a chain tensioner need to be equipped with a chain guide, e.g. Rohloff Chain Guide CC (Art. #8290). This prevents the chain from springing off the chainring.
Drive loss (following a gear change)
Cause 1: Axle nuts (CC/TS axle) secured too tightly.
Solution: Tighten axle nuts to the correct torque (CC: 7Nm / 60in lbs; TS: 35Nm / 310in lbs).
Cause 2: Shifter cable tension is too high. No positive feedback through the twist shifter.
Solution: Adjust shifter cable tension, see Maintenance and Care.
Cause 3: Gearbox oil too thick.
Solution: Add a little 'Rohloff Cleaning Oil' to the SPEEDHUB and go for a test ride. If drive loss is no longer present, then complete an oil change, see Oil Change.
Cause 4: Axle secured to frame using a security skewer (e.g. PITLOCK, Pinhead or Allen wrench system).
Solution: Tighten skewer to 7Nm /60 in.lbs.max. torque (pay close attention to the manufacturers advice).
Cause 5: Oil screw inserted too deep.
Solution: Fit a new oil drain screw. Insert no deeper than flush with outer face of hub shell.
None of the above: Contact the Rohloff Service Department.
Drive loss (following a gear change). Temperatures below 0°C
Cause 1: Gearbox oil too thick.
Solution: Carry out an oil change with an intensive rinsing. See Oil Change.
Cause 2: Riding the bike below -15°C.
Solution: Rinse the gear-unit and refill the hub with a 50:50 mixture of All Season Oil and Cleaning Oil (total oil volume = 25ml).
Drive Loss in gears #1 to #7 after removal of the axle ring or the external transfer box
Solution: Check the two freewheeling springs are present and fitted correctly.
See Hub Cable Replacement and Procedure after removing the axle-ring.
Freewheel does not function smoothly
Cause 1: Hub seal rubs against the sprocket.
Solution: Re-seat the hub shell seal. See Gear-unit Installation (possible until Serial.No. 25,299).
Cause 2: Strained hub bearings (crash or accidents).
Solution: Realign and destrain the hub shell bearing. See Gear-unit Installation.
Cause 3: Chain Tension too high.
Solution: Reduce the chain tension so approximately 5 mm of vertical slack is present. Replace and/or realign untrue chainrings.
Oil leaks
Cause 1: Light oil film present on SPEEDHUB components (no droplets).
Solution: This is not an oil leak - this is sweat oil. This is normal behavior of the construction of the SPEEHUB unit. Seals act as 'breathers' so oil can form around the hub bearing, the paper gasket and the oil drain screw due to variations in air temperature and pressure.
Cause 2: Oil leaks following horizontal transportation.
Solution: See Transportation.
Cause 3: Oil traces on the quick release skewer.
Solution: "See Cause 1". The CC and A12 axles also breath via a seal inside the hollow axle and can appear on the skewer which passes this. Oil traces on the quick release skewer are therefore normal.
Cause 4: Oil drops out of the hollow quick release axle.
Solution:
- Slide the inner tensioning axle/quick release in/out several times and wipe off any free oil (reservoir) from the axle with a cloth.
- alternatively with a pipe cleaner/Q-tip,
- Check axle plate screws TX20 and tighten if necessary (3Nm),
- Reinstall the quick release/axle (no more than 7Nm = hand tight).
Cause 5: Oil droplets on the axle ring, the axle plate or the concertina tubes (internal gear mech).
Solution: Check the axle plate screws are all in place and tightened to the correct tightening torque: See Aligning of the axle plate. Renew the paper gaskets between the axle ring and axle: See Procedure after removing the axle-ring and Hub Cable Replacement. Only use original Rohloff axle plate screws with pre-applied thread sealant.
Cause 6: Oil droplets between the hub shell and hub cap.
Solution: Check the hub cap screws are all in place and tightened to the correct tightening torque. See Gear-unit installation.
Cause 7: Oil traces around the oil drain screw.
Solution: Fit a new oil drain screw with pre-applied thread sealant. See Oil Change.
Cause 8: Oil droplets on the hub seals (both sides of the hub are smeared with oil).
Solution:
- Depending on the side, dismantle either the gear mech or the carrier/sproket
- Check the slip ring
- Clean the seal ring with a clean cloth/ear swab
- Install the switch control with a new paper seal and axle plate screws or mount the carrier/sproket
Complete blockage of the gear system after working on the external gear mech
Solution: (SPEEDHUBs with a Serial Number after 47,000, fitted with an external gear mech) The grub screw is inserted too far into the axle. This must sit proud of the axle end, by approx. 2mm. See Grub screw of the External Gear Mech.
Possible causes for flange breakages on bicycle hubs
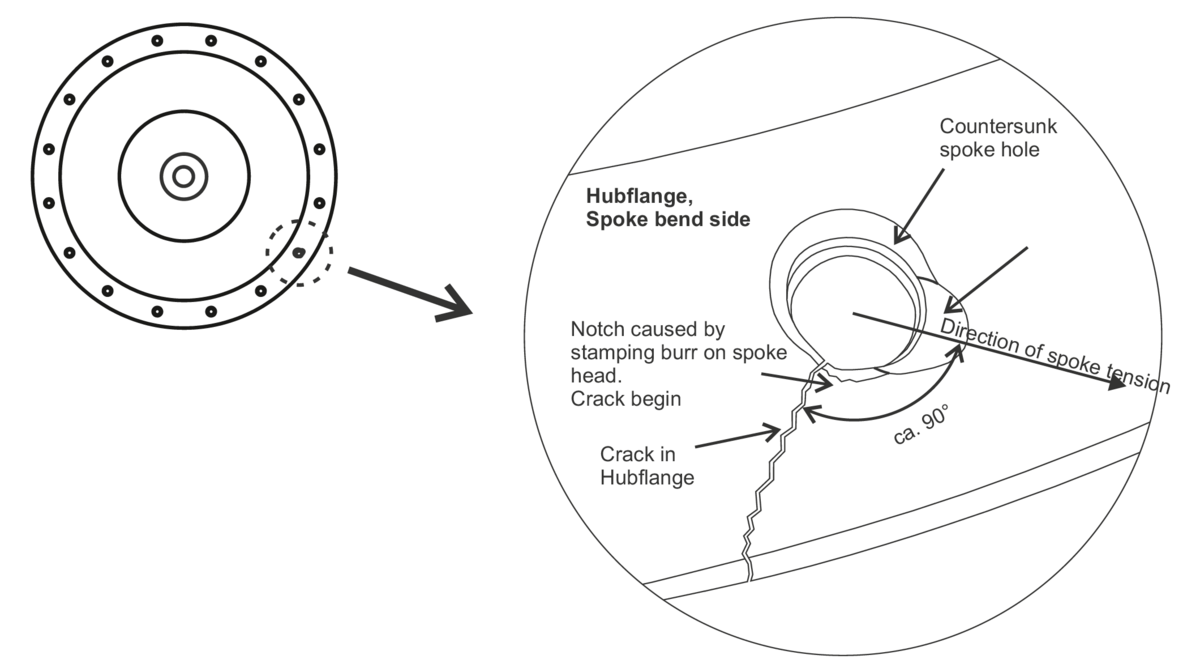
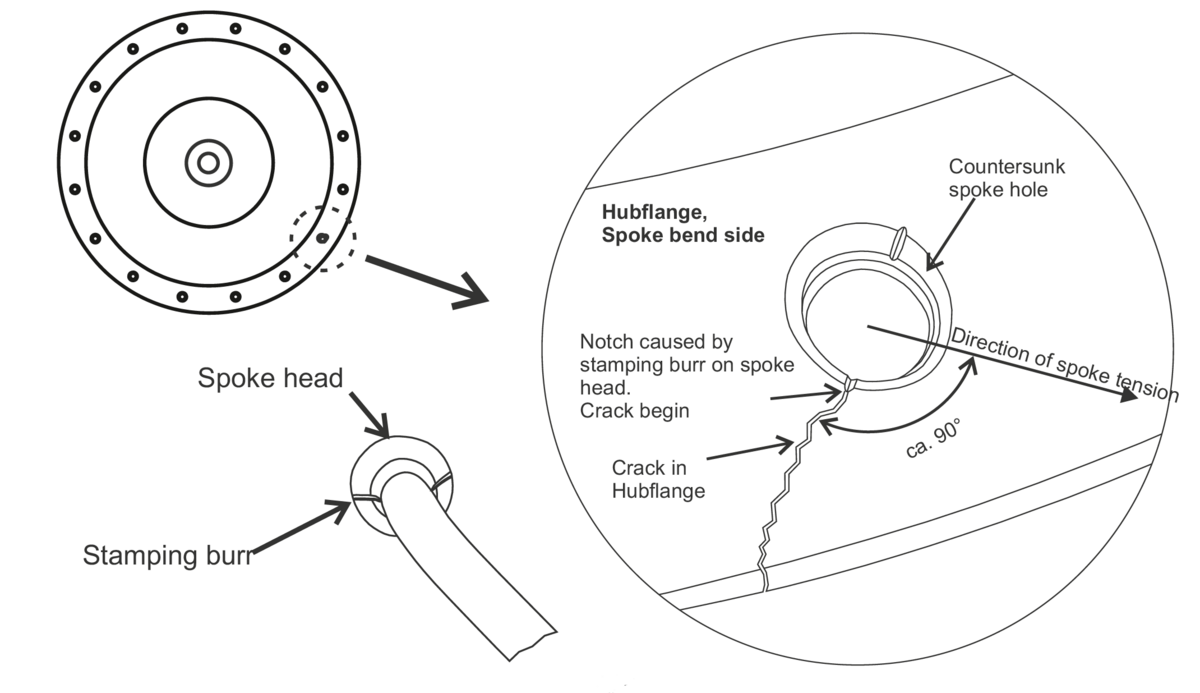
Stamping burr on the spoke head
Effect: The stamping burr on the back of each spoke head digs itself into the hub flange leaving a notch at the countersunk spoke hole. If spoke tension then drops below the 1000N requirement, then the burr will act as a saw blade and eventiually cut through the flange material.

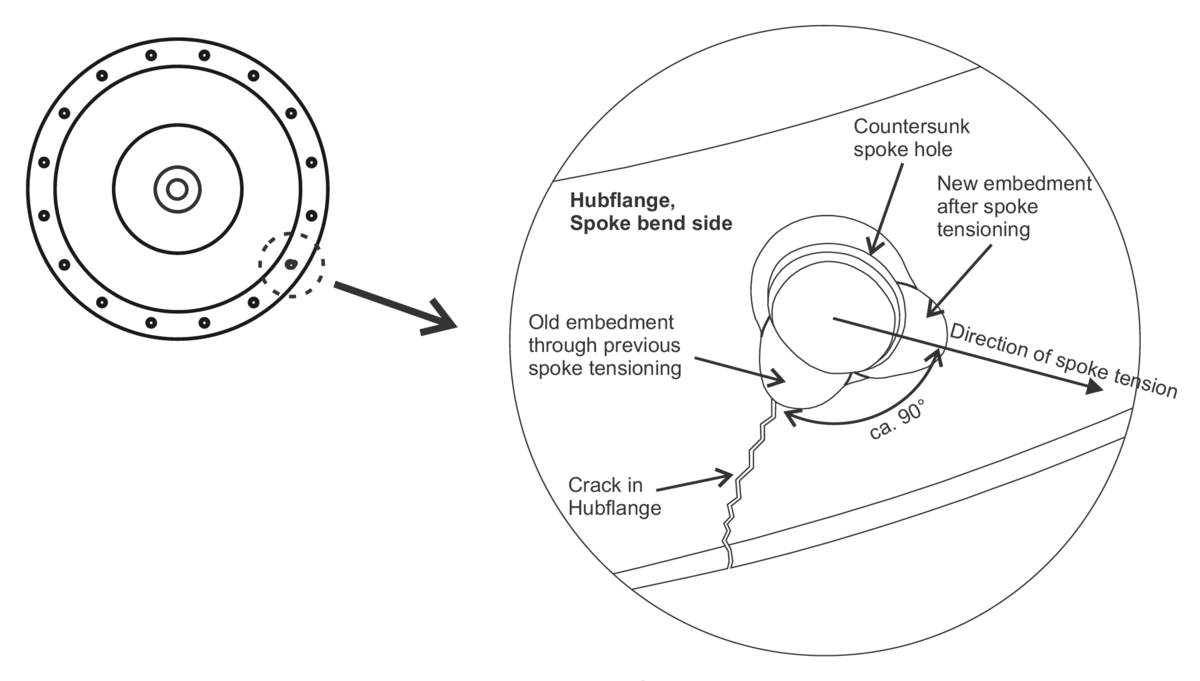
Re-lacing with an alternative spoke pattern (second lacing of a used SPEEDHUB)
Effect: The old spoke lacing pattern will have enabled the spokes to embed themselves into the spoke flange, damaging this slightly. If re-lacing in a different pattern, the flange gets damaged again somewhere else. By re-lacing in the exact same pattern, we reduce the number of damaged areas around the spoke hole and thus reduce the chances of the flange failing.