What you can expect to find on this page
The initial mounting of an A12 SPEEDHUB model into frames with 12mm thru axle dropouts is described on this page.
Background information: Before delivery of the SPEEDHUB A12, the 12mm thru axle dropouts of the frame were measured by a qualified bicycle workshop. Depending on this measurement result, we have selected or manufactured sockets and adapters for the right and left dropouts for this special frame.
You can find the A12 dropout measurement test instructions here.
Mounting Instructions
Instructions - Sprocket Side
Mounting the right-hand Rohloff A12 reduction sleeve: R, Sprocket side (pay attention to hardware package label). In special cases, please refer to the Exceptions section.
Applies to all types of thru axles: Remove O-Ring before use.

Syntace V1
- Insert the spacer fully into the right-hand dropout hole (Ø16mm) from the outside. Tighten the dropout clamp bolt in accordance to manufacturers guidelines.
- Slide the micro shims (if applicable) over the reduction sleeve, then insert the reduction sleeve into the spacer from outside.
Go to Nord-lock locking washers.
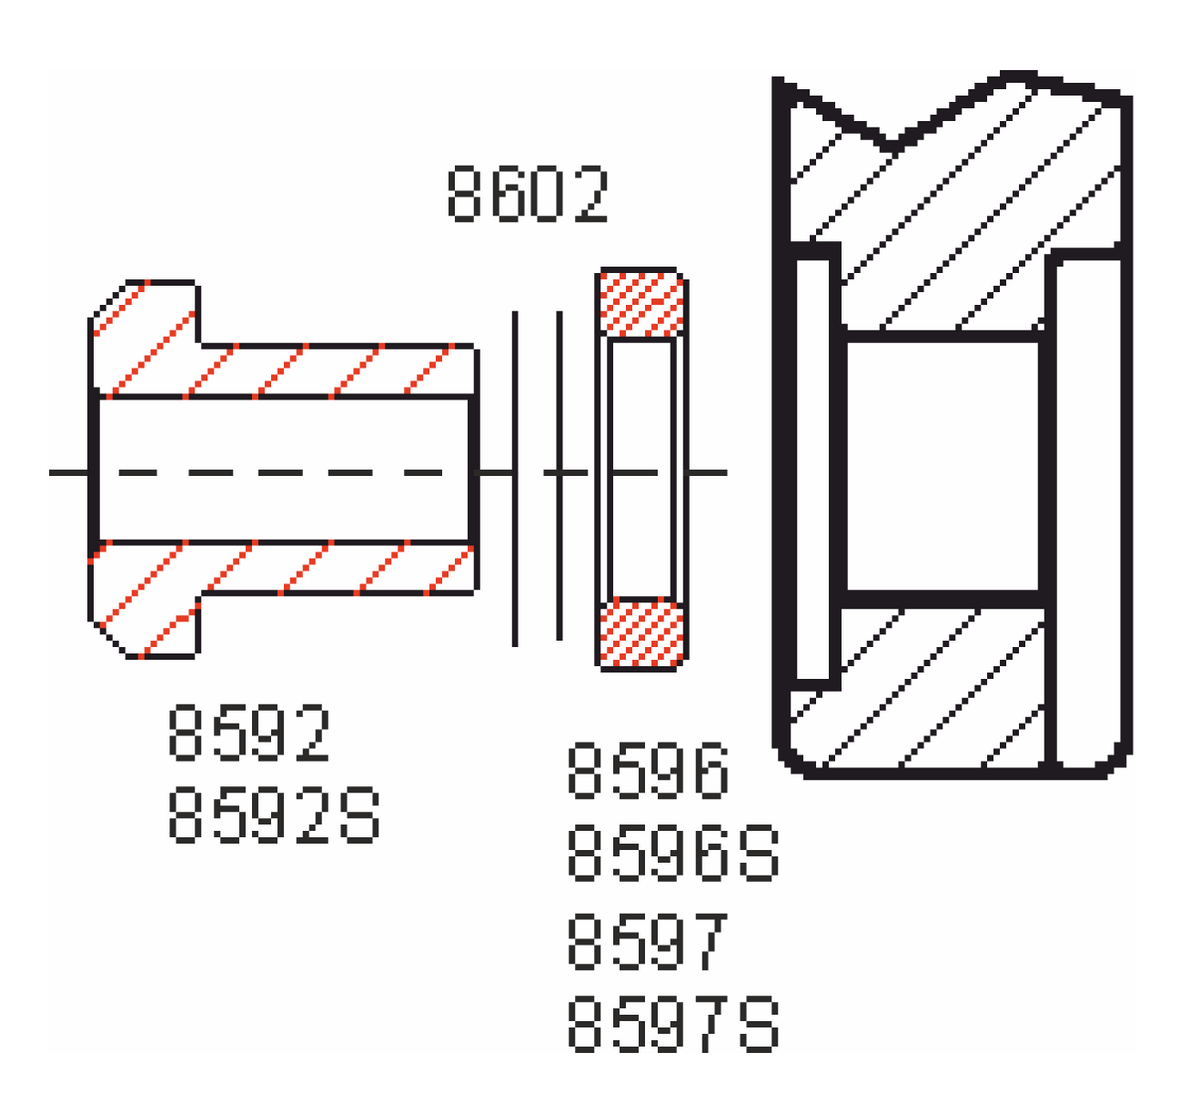
Legend (Art.No.)
Micro Shim: 8602
Spacer: 8595
Reduction Sleeve: 8592
Reduction Sleeve: 8592S-x.x
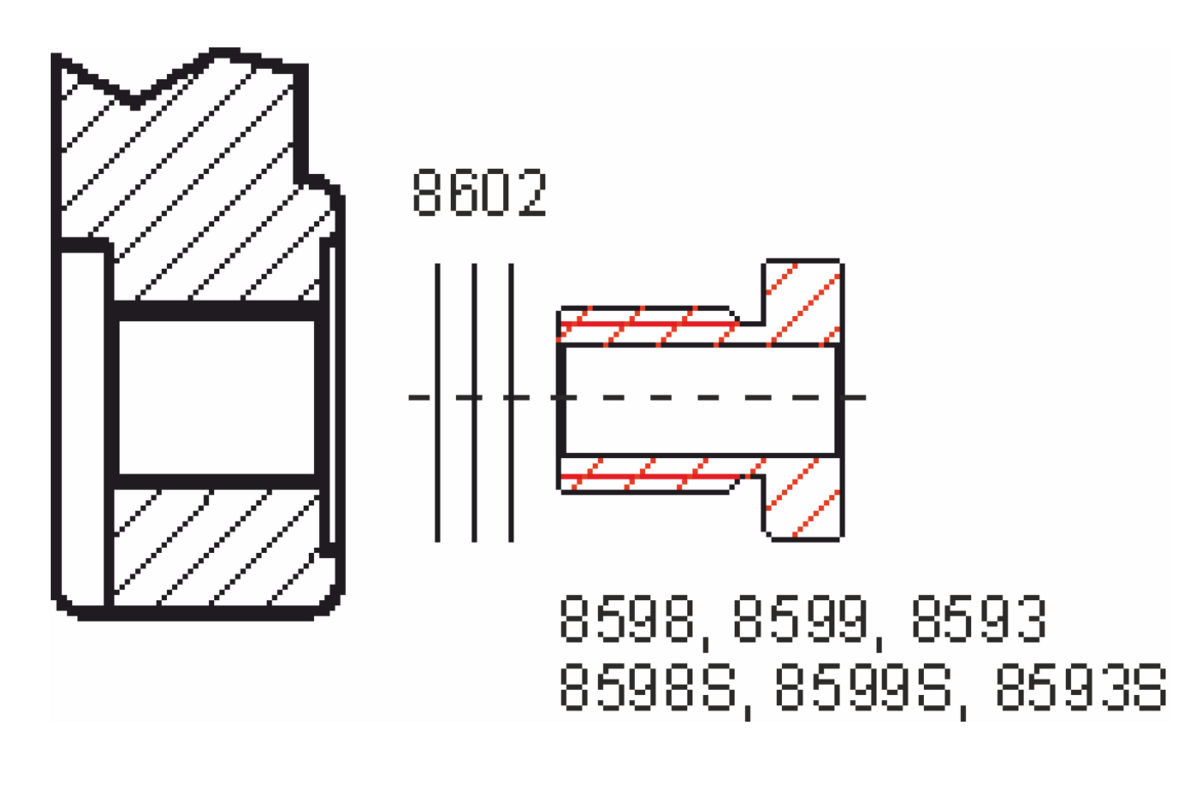
DT-Maxle / Syntace V2
- Slide the micro shims (if applicable) over the M12x1, M12x1.5 or M12x1.75 reduction sleeve.
- Then thread the reduction sleeve into the dropout from the outside (open 13mm wrench - tightening torque 10Nm).
Go to Nord-lock locking washers.
Legend (Art.No.)
Micro Shim: 8602
Threaded Reduction Sleeve:
8598 (M12x1), 8599 (M12x1.5), 8593 (M12x1.75)
Threaded Reduction Sleeve:
8598S-x.x (M12x1), 8599S-x.x (M12x1.5), 8593S-x.x (M12x1.75)
Shimano E-Thru 12mm
- Slide the micro shims (if applicable) over the reduction sleeve, then insert the reduction sleeve into the spacer from outside.
- Slide the Shimano spacer over the reduction sleeve, then insert the reduction sleeve/spacer unit into the dropout from the outside.
Go to Nord-lock locking washers.
Legend (Art.No.)
Micro Shim: 8602
Reduction Sleeve: 8592
Reduction Sleeve: 8592S-x.x
Shimano Spacer: 8596, 8597; 8596S-x.x; 8597S-x.x
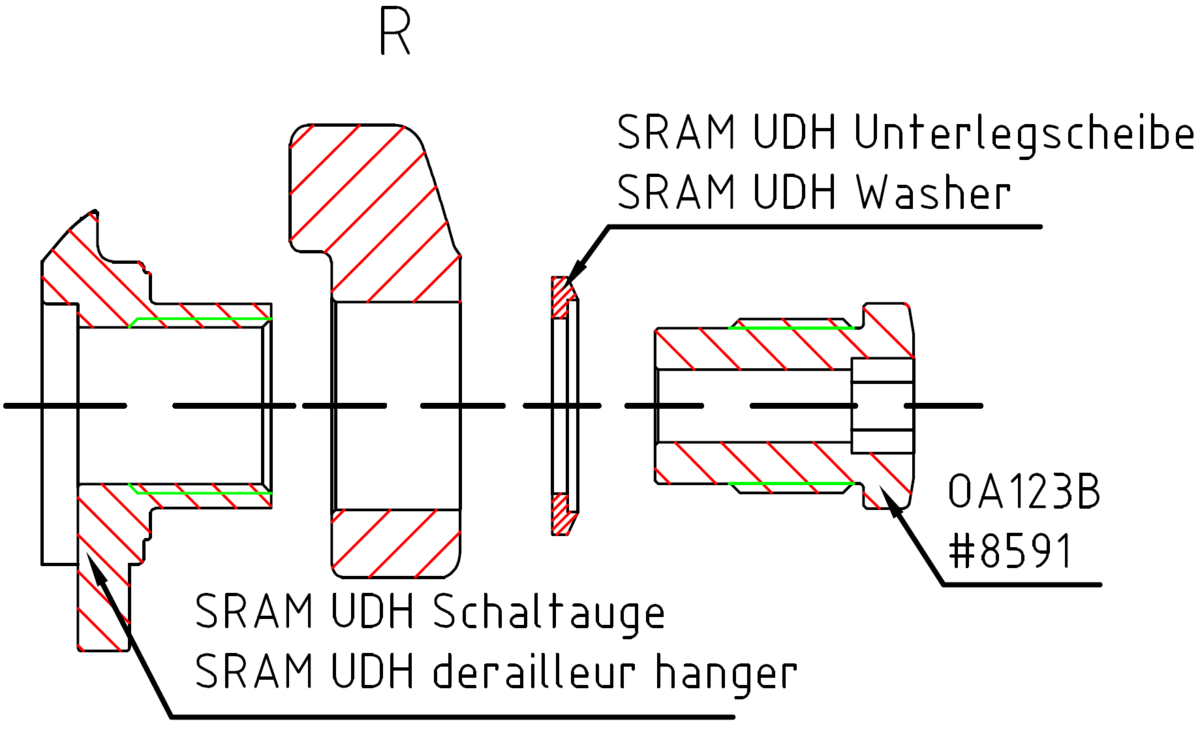
SRAM UDH
- SRAM UDH Bolzen remove (left-hand thread)
- SRAM UDH washer and SRAM UDH Schaltauge must be used
- mount Rohloff A12 UDH bolt 8591 (left-hand thread 25 Nm)
Go to Nord-lock locking washers.
Legend (Art.-No.)
Rohloff A12 UDH Bolt: 8591

Nord-lock locking washers
Ensure the Wedgelock face of the Nord-lock locking washers are correctly facing each other before sliding these over the M7 securing bolts.
Go to Fasten Sprocket Side.

Fasten Sprocket Side
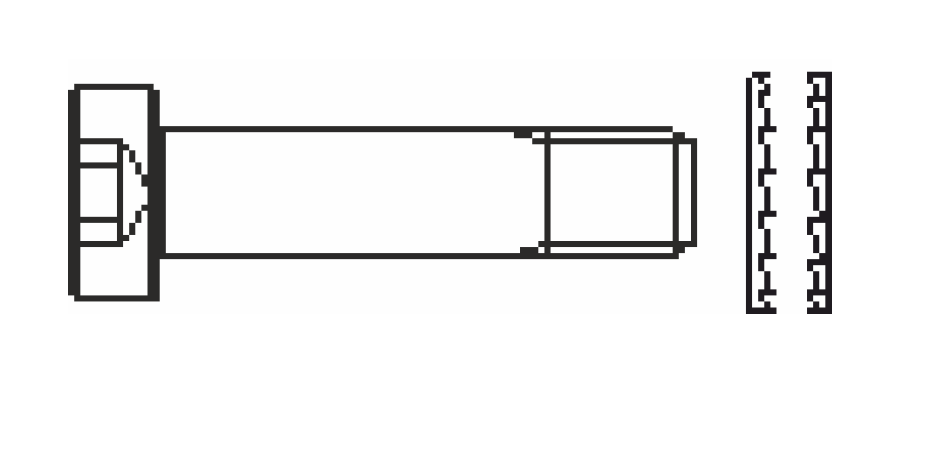
Slide the Nord-lock locking washers over the M7x30x1-silver bolt 142, 177, 197 (alternatively over the M7x36x1-black bolt (148mm Boost; SRAM UDH 142, 177, 197); over the M7x42x1-yellowish silver bolt (SRAM UDH 148mm Boost). Insert unit through the reduction sleeve and thread hand-tight into the A12 SPEEDHUB axle.
Go to Instructions Disc Brake Side.
Set Art.No. 8569
2 x Securing Bolts M7x30x1, silver (left'n'right)
4 x Nord-lock locking washers
Set Art.No. 8569B
1 x Securing Bolt M7x30x1, silver (left)
1 x Securing Bolt M7x36x1, black (right)
4 x Nord-lock locking washers
Set Art.-Nr. 8569U
1 x Schraube M7x30x1, silver (left)
1 x Schraube M7x42x1, yellowish silver (right)
4 x Nord-lock locking washers
Instructions - Disc Brake Side
Mounting the left-hand Rohloff A12 reduction sleeve: L, Gear Mech side (pay attention to hardware package label). In special cases, please refer to the Exceptions section.
Applies to all types of thru axles: Remove O-Ring before use.
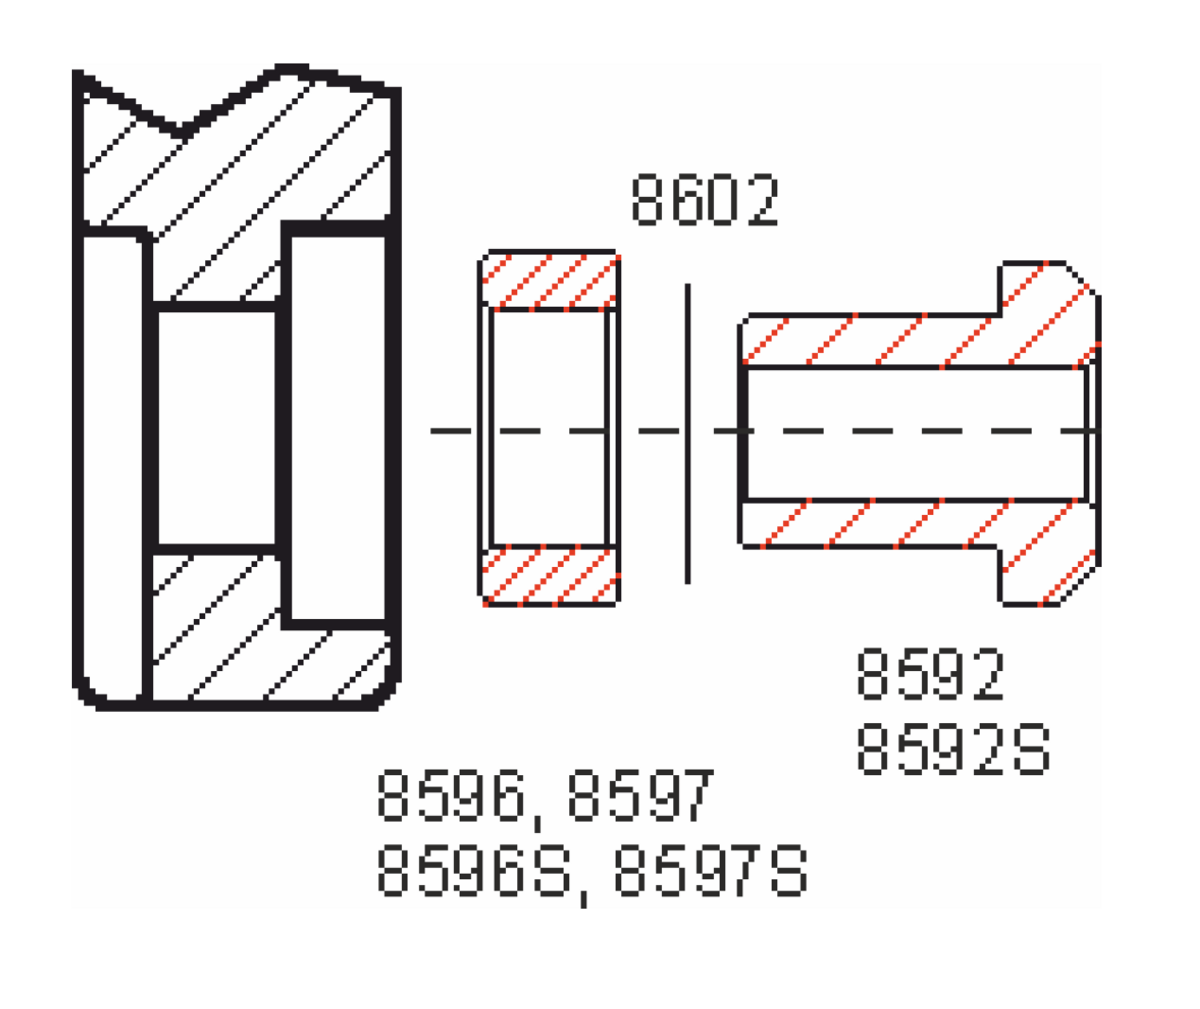
Syntace V1/V2
- Slide the micro shims (if applicable) over the reduction sleeve, then insert the reduction sleeve into the dropout from outside.
- Slide Syntace conical spacer over the reduction sleeve, then insert the reduction sleeve/spacer unit into the dropout from outside.
Go to Nord-lock locking washers.
Legend (Art.No.)
Micro Shim: 8602
Reduction Sleeve: 8592
Reduction Sleeve: 8592S-x.x
Syntace Conical Spacer: 8594

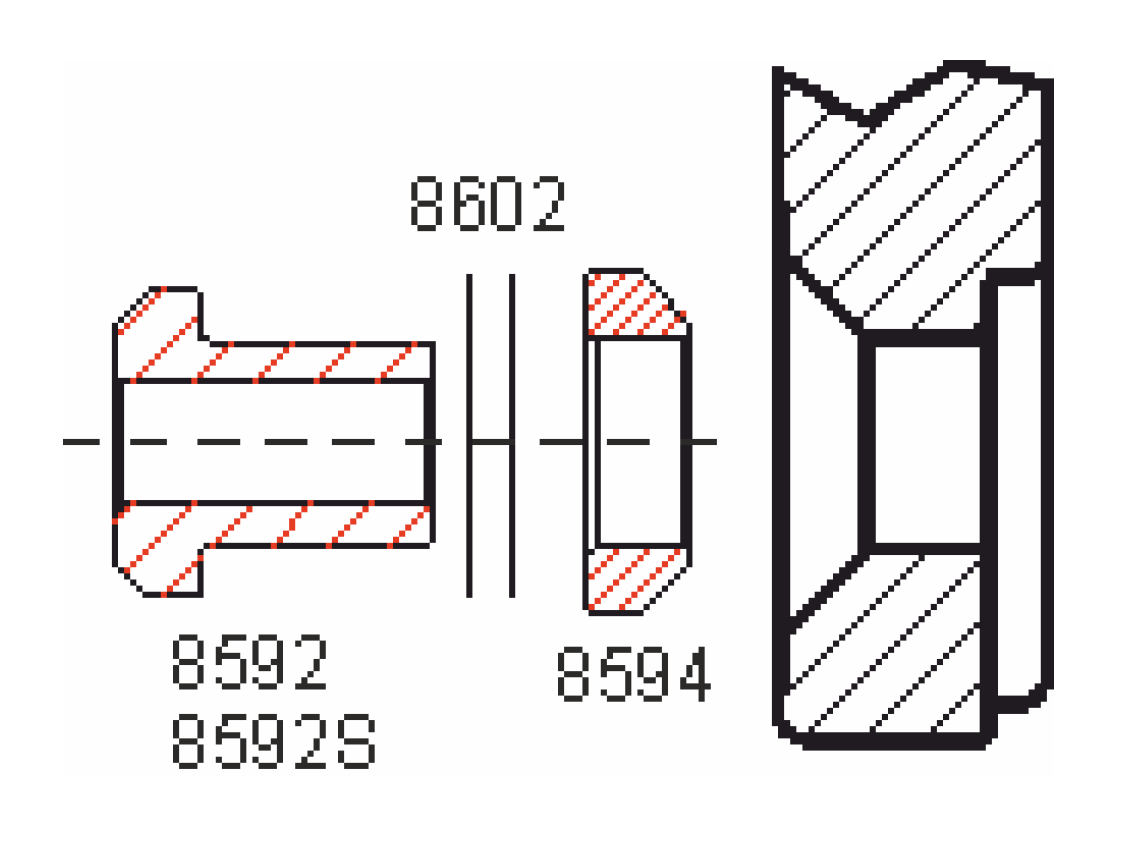
DT Maxle
Slide the micro shims (if applicable) over the reduction sleeve, then insert the reduction sleeve into the spacer from outside.
Go to Nord-lock locking washers.
Legend (Art.No.)
Micro Shim: 8602
Reduction Sleeve: 8592
Reduction Sleeve: 8592S-x.x
Shimano E-Thru 12mm
- Slide the micro shims (if applicable) over the reduction sleeve, then insert the reduction sleeve into the dropout from outside.
- Slide the Shimano spacer over the reduction sleeve, then insert the reduction sleeve/spacer unit into the dropout from the outside.
Go to Nord-lock locking washers.
Legend (Art.No.)
Micro Shim: 8602
Reduction Sleeve: 8592
Reduction Sleeve: 8592S-x.x
Shimano Spacer: 8596, 8597; 8596S-x.x; 8597S-x.x
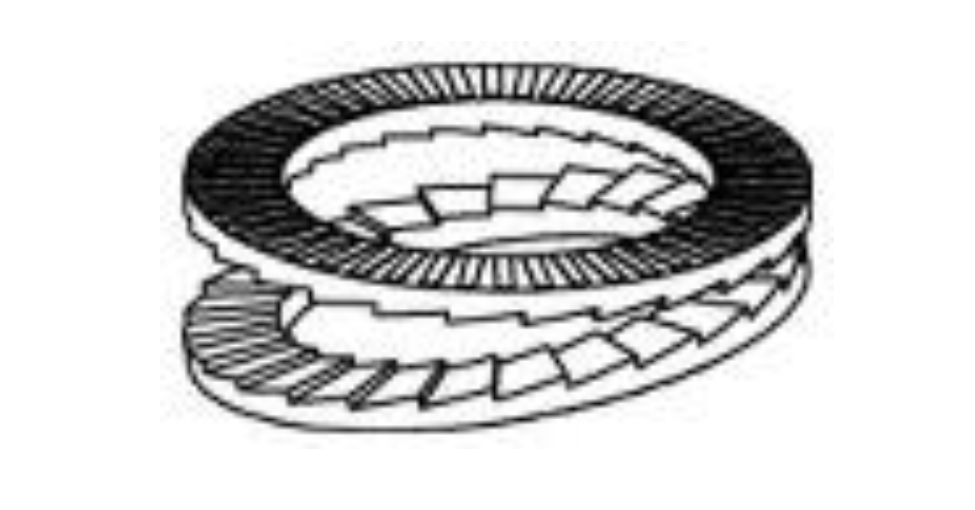
Nord-lock locking washers
Ensure the Wedgelock face of the Nord-lock locking washers are correctly facing each other before sliding these over the M7 securing bolts.
Go to Fasten Disc Brake Side.
Fasten Disc Brake Side
Slide the Nord-lock locking washers over the M7x30x1-silver bolts. Insert units through the reduction sleeves and thread hand-tight into the A12 SPEEDHUB axle.
Set Art.No. 8569
2 x Securing bolts M7x30x1, silver (left'n'right)
4 x Nord-lock locking washers
Set Art.-Nr. 8569B
1 x Securing bolt M7x30x1, silver (left)
1 x Securing bolt M7x36x1, black (right)
4 x Nord-lock locking washers
Set Art.-Nr. 8569U
1 x Securing bolt M7x30x1, silver (left)
1 x Securing bolt M7x42x1, yellowish silver (right)
4 x Nord-lock locking washers
Finally, tighten both securing bolts (5mm Allen wrench) in series, a quarter rotation at a time until the correct torque is applied (tightening torque: 15-20 Nm)
Adjust chain or belt tension to the manufacturers predetermined value.
Check SPEEDHUB wheel rotates smoothly. Done.
Exceptions
The large variety of different 12mm Thru-axle/dropout solutions on the market will no doubt require custom combinations of reduction sleeve/spacer as described in paragraphs Instructions Sprocket Side and Instructions Disc Brake Side (e.g. threaded left-hand dropout etc.). The mounting hardware package will be labelled „Custom“ in such cases.
Take note of the article number from the reduction sleeve row on the mounting hardware package label. Search for this article number in paragraphs Instructions Sprocket Side and Instructions Disc Brake Side of this instruction manual extension. Follow the guidelines for this article number to mount your A12 SPEEDHUB unit correctly.
Safety Notification
Please be aware that the internal SPEEDHUB transmission, as well as the outer construction and all torque anchoring apparatus remains identical to that used by all other SPEEDHUB versions. The single difference between regular SPEEDHUB models and A12 SPEEDHUB models, is the axle itself. As such, information on the use, selection and mounting of these components can be located in the regular SPEEDHUB Manual.
There are a few vital safety aspects that need to be adhered to alongside the general safety information located within the SPEEDHUB Owners Manual:
Bicycle trailer hitches which mount directly to the 12mm thru-axle, must not be used in conjunction with an A12 SPEEDHUB 500/14 unit. The additional thickness of the trailer hitch will hinder the specially produced M7 mounting bolt (increased stiffness) from penetrating the SPEEDHUB axle or axleplate deep enough. Threads will be stripped as there are not enough to adequately ensure the SPEEDHUB is mounted safely into the frame. A loose, insufficiently secured SPEEDHUB could lead to accidents and injuries so must be avoided.
Removal and mounting in frames with adjustable dropouts or eccentric BBs
The gear mech of every SPEEDHUB needs to be disconnected prior to removing the wheel from the frame. After this is removed, the A12 SPEEDHUB securing bolts must be loosened (Pointer: Nordlock locking washers will open with a clearly audible „crack“ sound) and removed. The A12 SPEEDHUB wheel can now be removed from the frame. Remove the loose A12 mounting hardware (reduction sleeves, spacers and washers) from the dropout and ensure they are retained in their correct order (left-hand/right-hand sets kept separately) to avoid confusion and possible incorrect later assembly.
Attempt to remount the A12 SPEEDHUB wheel correctly into the dropouts (see paragraph Insert the Wheel) without lowering chain/belt tension (e.g. adjusting dropout or eccentric BB position).
Thread both the left-hand and right-hand securing bolts two complete rotations by hand, into the A12 SPEEDHUB. Reduce belt/chain tension and repeat should this not be possible.
Tighten both securing bolts (5mm Allen wrench) in series, a quarter rotation at a time until the correct torque is applied (Tightening torque: 15-20 Nm).
Re-apply belt/chain tension if this was reduced to aid the mounting process. Ensure the correct belt/chain tension is applied in accordance with the belt or chain manufacturer’s instructions.