
General Notes

Tools
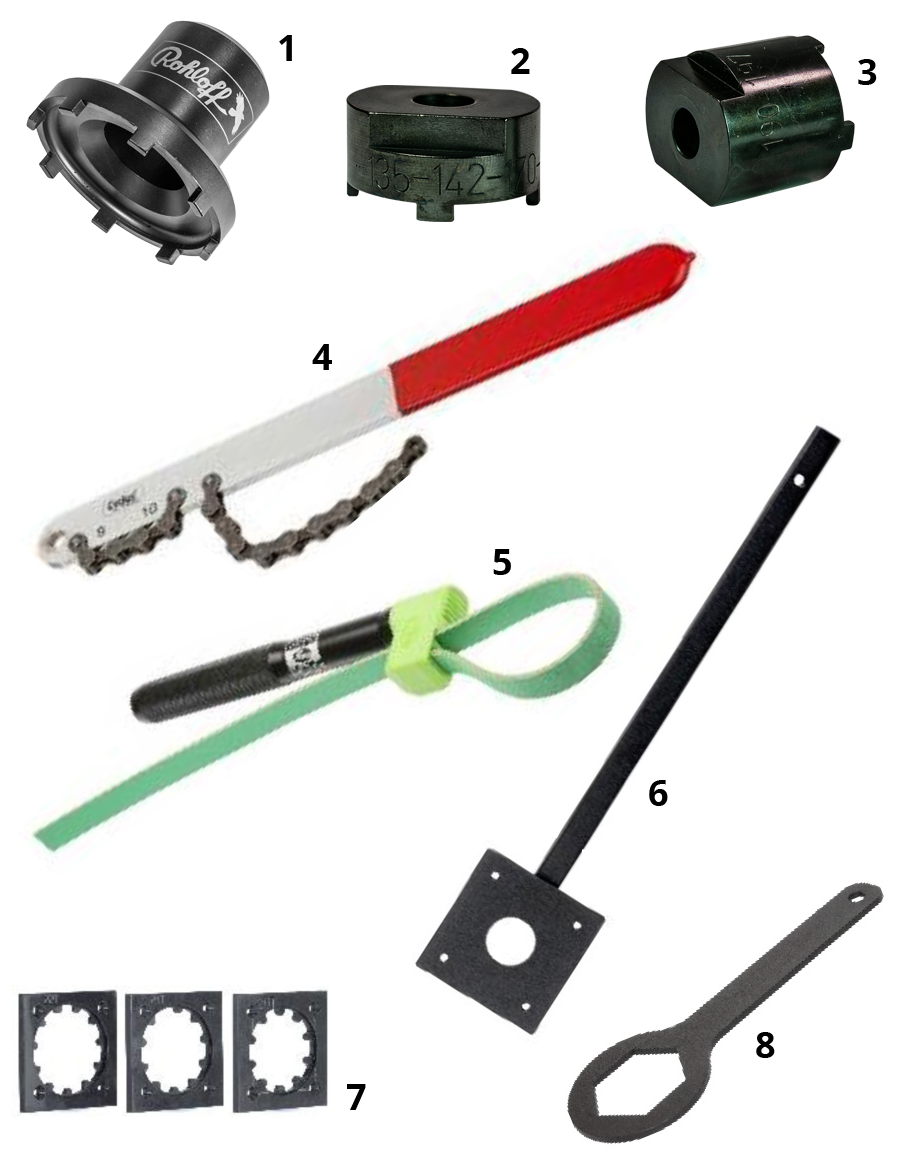
List of required tools
- Rohloff Lock-ring tool, Art. #8518
- Rohloff sprocket remover tool for 135/170/142/177 mm, Art. #8508
- Rohloff sprocket remover tool XXL for 148/190/197 mm, Art. #8509
- Chainwhip
- Gates Carbon Drive strap wrench
- Gates POM Key
- Gates POM Inserts
- Gates Flat Wrench SW 46mm, ½“ drive torque wrench
Link to the tool category in our B2B webshop.
Tools 1-3 can be found there for ordering.
Mounting
Installation with Special Tools
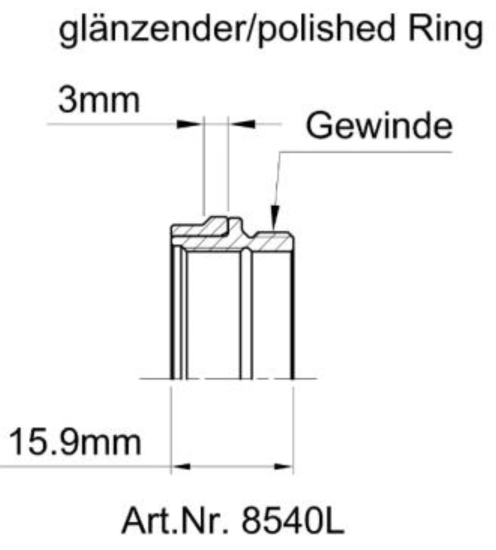
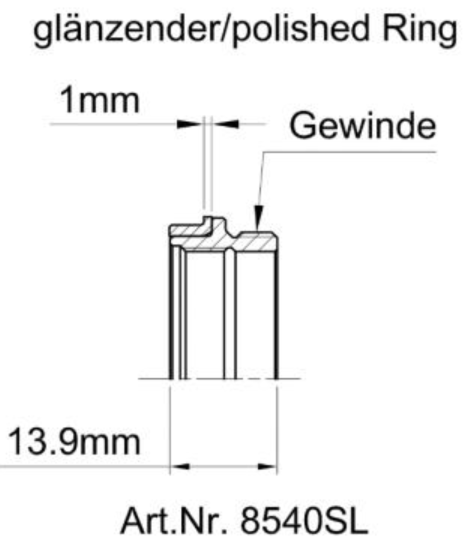
To mount a Gates Carbon Drive sprocket to a Rohloff Splined Carrier Lock-Ring #8540L/8540SL, proceed as follows:
- Place splined Rohloff / Gates Carbon Drive sprocket over the splined interface of the carrier
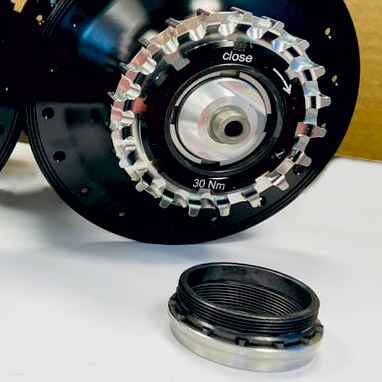
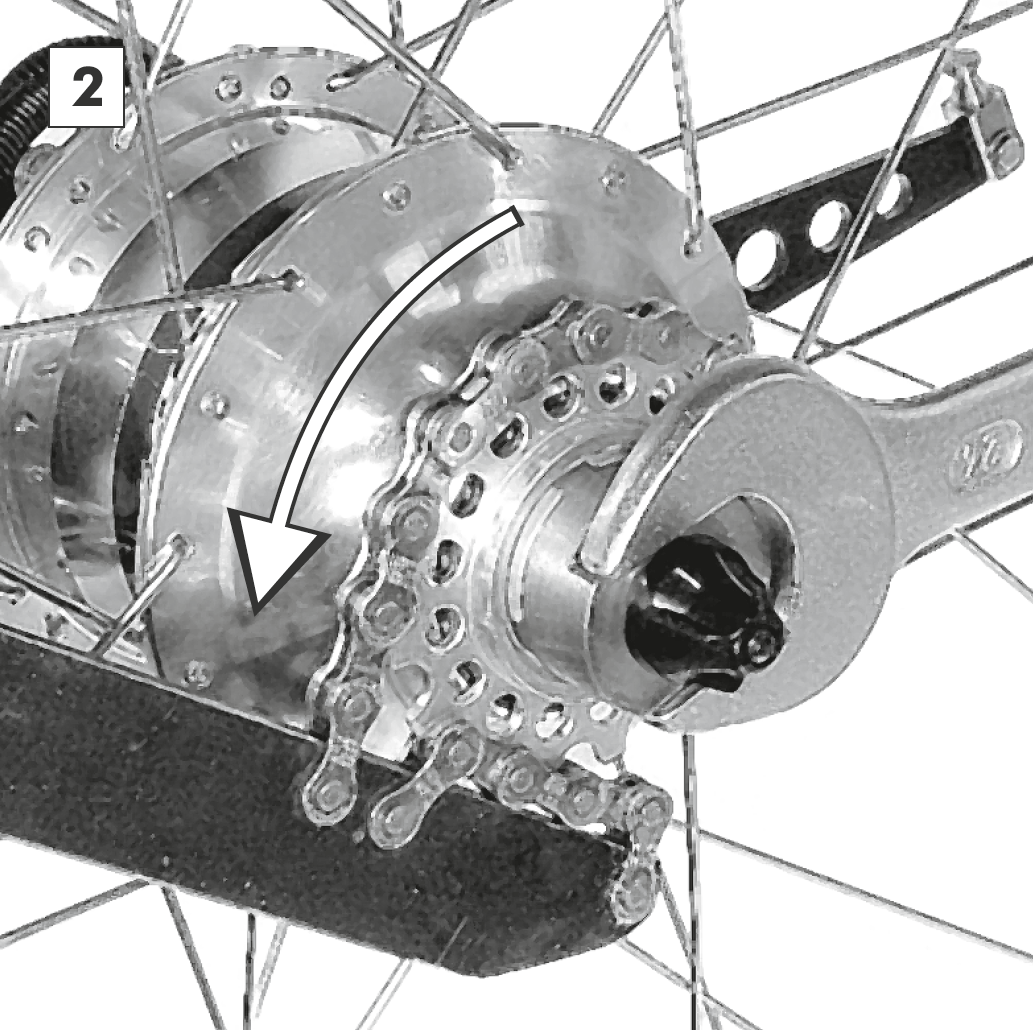
- Rotate splined Rohloff / Gates Carbon Drive sprocket in direction of drive to its bedstop. Now thread the lock-ring in arrow direction onto the carrier, until it rests against the face of the sprocket, holding it in this position
- Secure lock-ring in place with a torque of 30Nm. Do not use screw locking agents!
Without Special Tools (Emergency Repair)
- Place splined Rohloff / Gates Carbon Drive sprocket over the splined interface of the carrier
- Rotate splined Rohloff / Gates Carbon Drive sprocket in direction of drive to its bedstop. Now thread the lock-ring in arrow direction, by hand onto the carrier, until it rests against the face of the sprocket, holding it in this position
- Using a suitable tool (screwdriver, punch, chisel etc.) and a hammer, tighten the lock-ring by tapping this in the arrowed direction as indicated (Attention – torque value impossible to measure) do not use screw locking agents! Be sure to hold the tire / rim steady during this process
- Mount the rear wheel back into the bicycle.
Removal
Removal with Special Tools
To remove a Gates Carbon Drive sprocket from a Rohloff Splined Carrier Lock-Ring #8540L/8540SL, proceed as follows:
- Remove rear wheel from bicycle.
- Hold chain / Gates Carbon Drive sprocket steady and loosen lock-ring by rotating this in the opposing direction to that indicated by the arrow.
- Unscrew lock-ring completely and remove chain / Gates Carbon Drive sprocket from carrier.
Without Special Tools (Emergency Repair)
- Leave rear wheel mounted in bicycle
- Pull the rear brake with both bicycle wheels located firmly on the ground
- Apply tension to the chain / belt by pushing on the forward pedal
- Using a suitable tool (screwdriver, punch, chisel etc.) and a hammer, loosen the lock-ring by tapping this in the opposing direction to that indicated by the arrow
- Remove the rear wheel from the bicycle
- Unscrew lock-ring completely and remove chain / Gates Carbon Drive sprocket from carrier
Conversion
Conversion to Lock-Ring Version
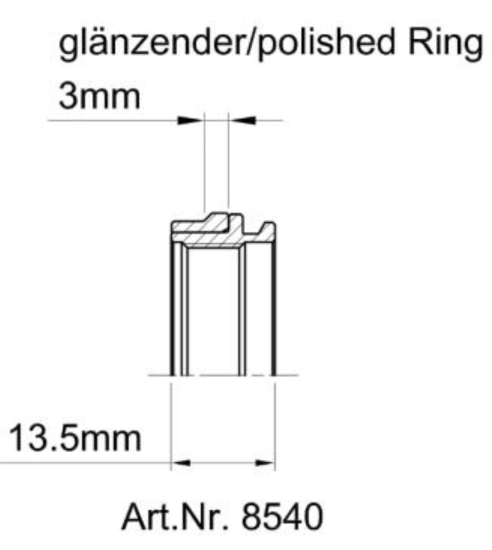
To replace a Splined Carrier #8540 with a Splined Carrier Lock-Ring #8540L/8540SL, follow the steps below.
Tools required are Gates POM Key (6) and Inserts (7) and possibly Flat Wrench SW 46mm (8).
- Remove rear wheel from bicycle
- Do not remove sprocket or circlip from carrier!
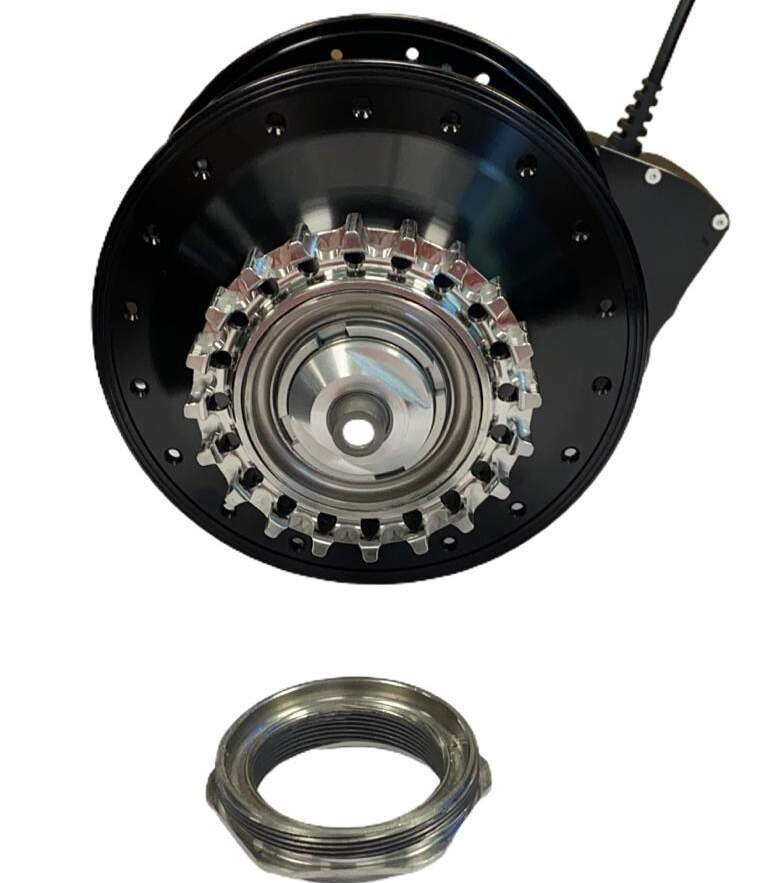
- Remove the entire sprocket/circlip/carrier assembly from the SPEEDHUB driver as illustrated in the section Sprocket reversing/replacing
- Fully thread Splined Carrier #8540L clockwise by hand onto the SPEEDHUB driver
- Place splined Rohloff / Gates Carbon Drive sprocket over the splined interface of the carrier
- Rotate splined Rohloff / Gates Carbon Drive sprocket in direction of drive to its bedstop. Now thread the lock-ring in arrow direction onto the carrier, until it rests against the face of the sprocket, holding it in this position
- Secure lock-ring in place with a torque of 30Nm. Do not use screw locking agents!
The dismantled Rohloff Splined Carrier (#8540 or #8540S) incl. retaining ring may no longer be used!
Please make both parts unusable and dispose of them.
Conversion from Threaded to Splined Sprocket
To replace a threaded with a splined sprocket using Splined Carrier Lock-Ring, follow the steps below. Tools required are the sprocket remover tool (2) or (3), POM Key/Insert (6) and, if necessary, FlatWrench SW 46 (8).
- Remove rear wheel from bicycle
- Remove Rohloff / Gates Carbon Drive threaded sprocket from SPEEDHUB
- See Sprocket reversing/replacing
- See Carbon Drive / Rohloff Owners Manual
- Fully thread Splined Carrier 8540L clockwise by hand onto the SPEEDHUB driver
- Place splined Rohloff / Gates Carbon Drive sprocket over the splined interface of the carrier
- Rotate splined Rohloff / Gates Carbon Drive sprocket in direction of drive to its bedstop. Now thread the lock-ring in arrow direction onto the carrier, until it rests against the face of the sprocket, holding it in this position
- Secure lock-ring in place with a torque of 30Nm. Do not use screw locking agents!
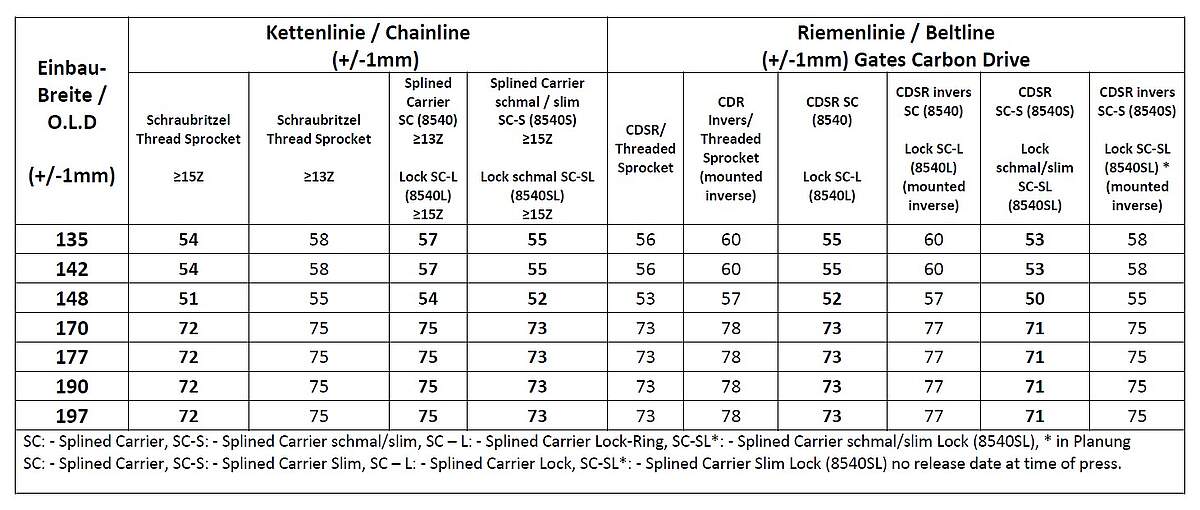
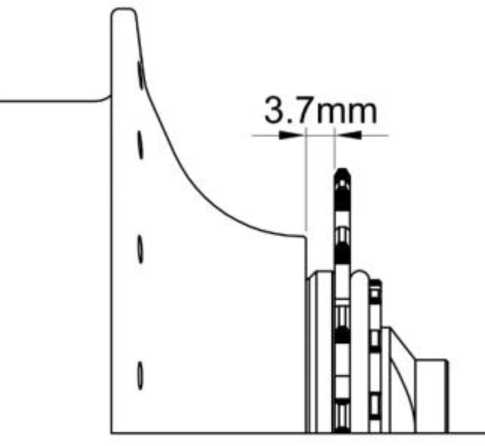
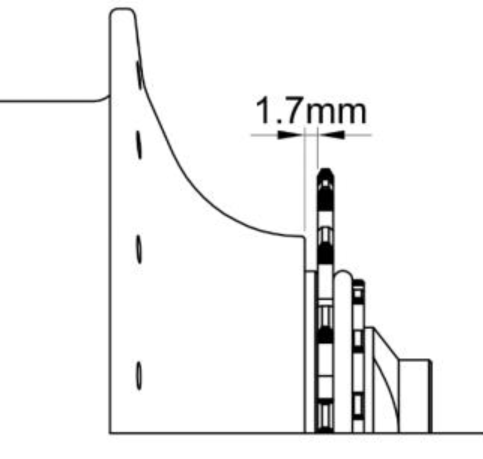
- Check chainline / beltline as well as Snubber and chain tensioner. Adjust if necessary.